Drywall Repair for Ceiling Damage: Addressing Water Stains and Cracks
For homeowners, a damaged ceiling can be a source of frustration. In addition to detracting from the aesthetic appeal of your house, ceiling damage—whether it takes the form of unsightly water stains or inconvenient cracks—may indicate underlying problems that require attention. Fortunately, common ceiling issues like water stains and cracks can be effectively repaired with drywall repair if you have the proper knowledge and skills. We will discuss how to resolve these problems step-by-step in this blog post.
Knowing the Reasons
It’s important to know what causes water stains and cracks in your ceiling before we start the repair process. This knowledge can assist you in locating the issue’s core cause and taking appropriate action to stop further harm.
Water Discolorations:
Water leaks from a variety of sources, including plumbing problems, condensation, and roof leaks, are usually the cause of water stains on your ceiling. These stains can vary in size and shape and frequently show up as discolored patches on the ceiling. To stop further damage, the source of the water intrusion must be found and fixed before repairing the stained ceiling.
Breaks:
Many things, such as shifting temperatures, settling of the house, or structural problems, can result in ceiling cracks. While some cracks are purely cosmetic and minor, others might be signs of more serious issues. To choose the best repair technique, it’s critical to evaluate the kind and extent of cracks.
Let’s now examine some effective ways to deal with these problems.
Fixing the Ceiling’s Water Stains
Supplies You’ll Need:
- Safety equipment (dust mask, gloves, and goggles)
- Step stool or ladder
- Pail
- rag or fabric
- Stain-blocking primer or bleach
- Drywall joint material
- Mesh tape or drywall patch
- Putty knife
- Medium-grit sandpaper
- Both paint and a paintbrush
Step 1: Prioritize Safety
When performing ceiling repair work, safety should always come first. Put on safety gear to shield your hands, eyes, and lungs from chemicals and dust. Make sure your step stool or ladder is properly positioned and stable.
Step 2: Determine the Source and Fix It
Finding and fixing the source of the water leak is crucial before treating the water stain on your ceiling. This action is essential to stop additional harm. If necessary, seek advice from a qualified roofer or plumber to find and fix the leak.
Step 3: Spot Clean the Area Spotted
After identifying and fixing the leak’s source, clean the affected ceiling area. To treat the stained surface, use a stain-blocking primer or a solution of bleach and water (1:1). This procedure aids in stopping the growth of any leftover mildew or mold.
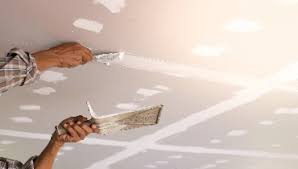
Step 4: Make Repairs and Patches
It’s time to patch and restore the damaged drywall after the stain has dried and been treated. First, cover the stained area with a layer of drywall joint compound. Utilizing a putty knife, distribute it evenly. You might need to apply mesh tape or a drywall patch over the affected area if the stain has caused the drywall to sag or become structurally compromised.
Step 5: Grind and Polish
After the joint compound has fully dried, use medium-grit sandpaper to smooth out the repaired area. The objective is to produce a surface that is uniformly smooth and blends in perfectly with the surrounding ceiling. Before proceeding to the next step, make sure to remove any dust.
Step 6: Apply Paint
Paint the repaired area to match the ceiling’s overall color to finish the repair. Apply paint with the same hue and sheen as the existing paint. An even finish can be achieved by priming the surface before painting.
Fixing the Ceiling Cracks
Supplies You’ll Need:
- Safety equipment (dust mask, gloves, and goggles)
- Step stool or ladder
- Putty or utility knives
- Drywall joint material
- Mesh tape or drywall patch
- Medium-grit sandpaper
- Both paint and a paintbrush
Step 1: Prioritize Safety
Prioritize safety as with any do-it-yourself project. Make sure your ladder or step stool is stable and in the proper position, and wear the proper safety equipment.
Step 2: Examine Any Cracks
Examine the type and severity of the cracks in your ceiling. There are two primary categories for cracks:
- Hairline Cracks: These are thin, superficial cracks that are frequently brought on by changes in temperature. Usually only decorative, they don’t affect the structural integrity of the ceiling.
- Larger or Structural Cracks: These cracks need to be fixed right away because they could be signs of more serious structural problems. Before attempting repairs, seek professional advice if you suspect a structural issue.
Step 3: Get the Crack Ready
Use a utility knife or putty knife to carefully widen hairline cracks by a small amount. The joint compound adheres more readily as a result. Clear the crack of any loose dust or debris.
Step 4: Apply Joint Compound
Using a putty knife, smooth an even layer of drywall joint compound over the crack. You might need to insert drywall patch or mesh tape into the joint compound for wider or structural cracks in order to strengthen it.
Step 5: Grind and Polish
Use medium-grit sandpaper to sand the repaired area after the joint compound has completely dried. Sand the repaired area until it is smooth and the surrounding ceiling appears seamless.
Step 6: Apply Paint
Paint the repaired area to match the ceiling’s overall color to complete the repair. Apply paint with the same hue and sheen as the existing paint. Achieving an even finish can be facilitated by priming before painting.
When to Seek Professional Advice
Even though small water stains and tiny cracks can frequently be fixed by the homeowner, there are some situations where hiring an expert is preferable:
1. Structural Issues: Before making any repairs, speak with a structural engineer or contractor if you believe that the cracks in your ceiling are the result of serious structural issues, such as problems with the foundation or damage to your roof.
2. Extensive Water Damage: It’s critical to have a professional evaluate the extent of the damage and make the necessary repairs if the water stain on your ceiling is the result of extensive water damage, such as a burst pipe or an extended leak.
3. Concerns about Asbestos: If the ceiling in your house was constructed before the late 1970s, there may be asbestos present. It is dangerous to try to repair or remove asbestos-containing materials; only qualified professionals should do this.
If you need assistance with drywall repair or have concerns about the condition of your ceiling, don’t hesitate to reach out to experienced professionals who can provide the guidance and expertise needed to fix up your home with drywall repair.
In conclusion, many homeowners find that repairing drywall to fix water stains and cracks in their ceiling is a doable do-it-yourself project. You can restore the integrity and look of your ceiling by being aware of the causes, taking the right action, and putting safety first. But it’s important to know when to call in an expert, particularly when handling structural problems, significant water damage, or possibly asbestos-containing materials. You can feel secure in your home knowing that your ceiling is safe and structurally sound with a professional inspection and repair, view the Taylor Locklear Drywall website.